7 Creative Ways to Grind Coffee Beans Without a Grinder (and Which One Tastes Best)
Share
Picture this: you wake up craving that perfect cup of coffee, only to realize your grinder decided to take an unscheduled break. Or maybe you're traveling and forgot to pack it. Don't panic—your morning brew isn't doomed. With a little creativity and some common kitchen tools, you can still turn those precious beans into the foundation of a great cup.
But here's the thing: not all grinding methods are created equal. The key to exceptional coffee lies in achieving consistent particle size, and some DIY methods deliver surprisingly good results while others... well, let's just say they're better suited for emergencies than everyday brewing.
Why Grind Size Consistency Actually Matters
Before we dive into the methods, let's talk about why this matters. When you brew coffee, hot water extracts flavors from your grounds at different rates depending on particle size. Smaller particles extract faster and can become bitter, while larger chunks extract slowly and might taste sour or weak. Consistent grinding ensures even extraction, which means balanced flavor in your cup.
Professional burr grinders excel at this consistency, but several household alternatives can get surprisingly close. Here's how they stack up:
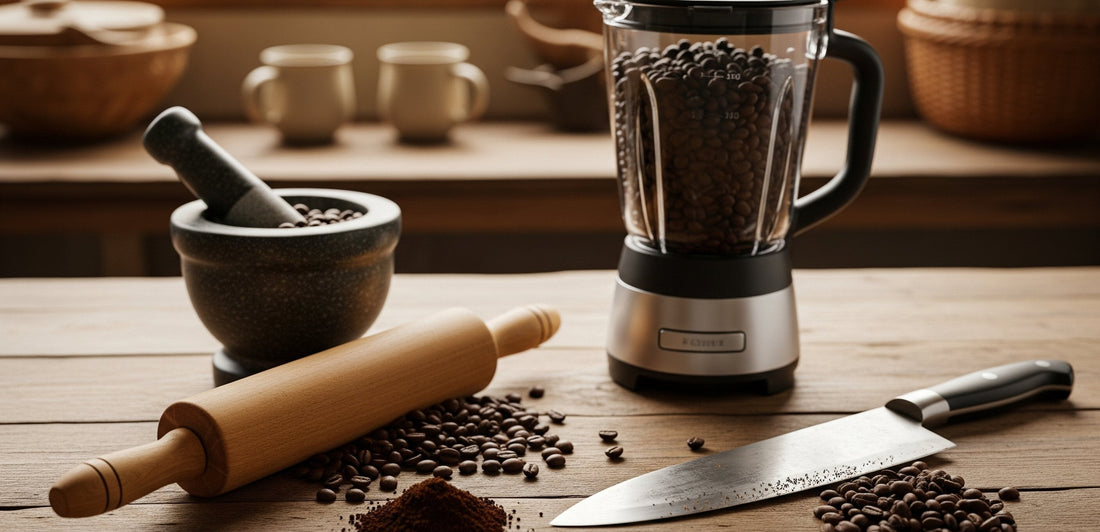
Method 1: The Rolling Pin Technique
What you need: Rolling pin, clean kitchen towel, cutting board
This is probably the most controlled method on our list. Place your beans in a clean kitchen towel, fold it over, and roll with steady pressure. The key is using short, controlled strokes rather than long rolls—this prevents beans from shooting out the sides.
Results: Surprisingly even medium grind, perfect for drip coffee or pour-over methods. The texture resembles coarse sea salt when done right.
Pros: Great control, relatively quiet, produces fairly consistent results
Cons: Takes some elbow grease, can be time-consuming for large batches
Method 2: Mortar and Pestle Power
What you need: Large mortar and pestle (the bigger, the better)
This ancient grinding method works beautifully for coffee. Add a small handful of beans and use a twisting, crushing motion rather than straight pounding. Work in small batches—about 2 tablespoons at a time for best results.
Results: Excellent consistency when done patiently, can achieve anything from coarse to fine grind
Pros: Superior control over grind size, very consistent results, works for any brewing method
Cons: Labor-intensive, requires a substantial mortar and pestle, time-consuming
Method 3: The Blender Blitz
What you need: High-powered blender or food processor
Use short pulses—never continuous blending. Start with 2-3 second pulses, shake the container, then repeat. The goal is to avoid overheating the oils in your beans, which can create bitter flavors.
Results: Fast but inconsistent, with a mix of powder and larger chunks
Pros: Quick for large quantities, minimal effort required
Cons: Very inconsistent particle size, risk of overheating beans, can create too much powder
Method 4: Hammer Time
What you need: Hammer, thick plastic bag or towel, cutting board
Place beans in a sturdy plastic bag, wrap in a towel, and tap gently with a hammer. The key word here is "gently"—you're not trying to demolish anything. Use controlled taps and check your progress frequently.
Results: Coarse, uneven grind suitable for French press or cold brew
Pros: Works in a pinch, good for coarse grinds
Cons: Difficult to control, messy, very inconsistent, surprisingly loud
Method 5: The Knife Flat Method
What you need: Large chef's knife, cutting board
Place beans on your cutting board and lay the flat side of your knife over them. Press down firmly while rocking slightly. This crushes rather than cuts the beans, which is what you want.
Results: Coarse, somewhat uneven grind
Pros: Uses tools you definitely have, quiet operation
Cons: Tedious for more than a few beans, inconsistent results, potential safety concerns
Method 6: Freezer Bag + Meat Tenderizer
What you need: Heavy-duty freezer bag, meat tenderizer or similar blunt tool
Similar to the hammer method but with more control. The meat tenderizer's textured surface can actually help create more consistent results than a smooth hammer.
Results: Medium-coarse grind with decent consistency
Pros: Better control than hammer method, creates decent particle size
Cons: Still fairly inconsistent, requires some effort
Method 7: The Spoon Crush
What you need: Two sturdy spoons
Hold beans between two spoons and apply pressure while twisting. This works best for small quantities and softer, darker roasts.
Results: Very coarse, uneven chunks
Pros: Uses common utensils, quiet
Cons: Only works for tiny amounts, very inconsistent, labor-intensive
The Taste Test Results
After testing all seven methods with the same medium roast beans and brewing identical pour-over cups, here's how they ranked:
Winner: Mortar and Pestle - The most consistent grind produced the cleanest, most balanced cup with bright acidity and clear flavor notes.
Runner-up: Rolling Pin - Surprisingly close second place. The controlled crushing action created good consistency, resulting in a well-balanced brew with only slight over-extraction in the fines.
Third Place: Meat Tenderizer Method - Decent consistency for the effort required, produced a drinkable cup with some unevenness but no major flavor flaws.
The blender method, while fast, created too many fine particles that led to over-extraction and bitterness. The hammer and knife methods were simply too inconsistent for good results, and the spoon method... let's just say it's better saved for true emergencies.
Pro Tips for Better Results
- Work with small batches—never try to grind more than 2-3 tablespoons at once
- Use a coarser grind than you think you need; most improvised methods create more fines than expected
- Adjust your brewing time accordingly; inconsistent grinds often need shorter extraction times
- Consider your roast level—darker roasts are more brittle and easier to grind by hand
- Clean your tools thoroughly before and after use to avoid off-flavors
Quick Visual Guide to Grind Sizes
For reference, here's what you're aiming for:
- Coarse (French Press): Like coarse sea salt or breadcrumbs
- Medium-Coarse (Pour-over): Like rough sand or kosher salt
- Medium (Drip Coffee): Like table salt
- Fine (Espresso): Like powdered sugar
When It's Time to Upgrade
While these methods can save your morning coffee, they're definitely not long-term solutions. If you find yourself relying on them regularly, it might be time to consider a proper grinder. Hand grinders offer many of the same benefits as these DIY methods—they're quiet, portable, and give you complete control over the process—but with the consistency that makes truly great coffee possible.
The ritual of hand-grinding can actually be quite meditative, and unlike improvised methods, it won't wear out your kitchen tools or require you to wrestle with a rolling pin at 6 AM.
Ready for a better option? Check out our Feima series coffee grinders to find the perfect fit for your brewing style and budget. Your taste buds (and your rolling pin) will thank you.